Do you have a growing team? Are you meeting with everyone via Zoom but having a hard time keeping track of where each individual is at? Creating a custom map with a pin for each person’s location is a simple way to keep everyone on the same page. Whether viewing the map from an iPhone, Android, desktop computer, or anything else – a Google map allows your team to see the locations you pin in real time.
Create a Gmail Account
If you don’t already have Gmail or a Google account, now is the time to sign up. It’s completely free and allows access to a variety of programs, including Google Maps. This article provides an informative overview of Gmail and its 1.8 billion+ users if you want to explore further before signing up.
Go to Google My Maps
To save yourself the time of doing a Google search, the specific URL is mymaps.google.com.
Click Create a New Map
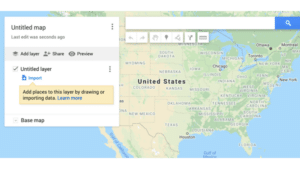
This will bring up the following map image. Click on the words ‘Untitled map’ and rename the map image to whatever you prefer.

Import Your Data Points as a CSV File
Under ‘Untitled layer’ is the option to ‘Import’ your own data. You can do this by creating a report in your CRM (Salesforce, Monday.com, Oracle, or even an Excel File). You’ll want to include details such as:
- First Name
- Last Name
- Address
- City
- State
- Zip Code
- Department
- Title
Once your report has the data you’d like displayed on your custom map, save it as a CSV file. Make sure there are NO blank rows or columns, as everything in this file is what will import to your map. Include header rows (Address, City, State, and so on), as this is what will help organize your map upon import. Back on Google Maps, select ‘Import,’ Upload, then Select a file from your device. Select your CSV file and follow the prompts.
Choose Columns to Position Your Placemarks
Select your address fields (Address, City, State – or whatever you’ve labeled on your CSV file). Click ‘Continue’.
Choose a Column to Title Your Markers
Select which field you’d like to display as the title, for example, First Name. Click ‘Finish,’ and this will map your team.
Share Your Map
If everything looks good, it’s time to share your map. Copy and paste the webpage link, add it to your shortcuts, and make good use of it! Your team will find the Google Maps platform is an excellent tool with many useful functionalities.
Helpful Items to Note:
If you receive an error message stating certain rows cannot be shown on the map, click ‘Open data table’ to review. These are most likely P.O. boxes or addresses Google cannot find, and if it’s not a physical address, Google cannot use it as a pin on your map. You can fix the error message by correcting the address or simply deleting the P.O. box field (leaving just the City and State).
You can create an API key to authenticate your users. Create credentials, then the API key.
One of the map features is the ability to separate your team members using the ‘Uniform style’ option. If you have different titles or departments, this can be an extremely helpful option: Click ‘Uniform Style,’ Group places by (select the drop-down you’d like to group by, depending on your CSV file). Once grouped, you can adjust the color for each grouping.
To embed on your website, click the three dots to the right of your map name, then ‘Embed on my site’ to get the embed code.
You can edit individual pins on the map at any time. To do so, select the pin you’d like to edit, click the edit pencil, make your updates, then save.
The map will track your number of views, which allows you to see how helpful it is for your team members over time.
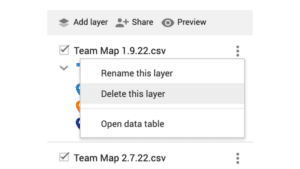
As your number of team members continues to grow, you can add an additional layer however often you’d like. Follow the steps above, and once your new layer is added, go back to your original layer, click the three dots, then ‘Delete this layer.’ That will leave your updated ‘layer’ as the only version on the map without changing the map URL that your team uses.

That’s it! You’ve created your customized Google Map. Free of charge, I might add! You’ve got to love any option that doesn’t have pricing per month tied to it.
CONGRATULATIONS on your growing team! If you need assistance sourcing candidates as you continue to grow, reach out to our qualified recruiting team. We love matching our candidates with fun, growing companies. Some of the many positions we can help with include Hospitality, Finance & Accounting, Corporate, Executive, Manufacturing, Engineering, Marketing, Sales, Senior Living, Healthcare, and more. Reach out today.
Share This Article


